This expanded guide will show you how to build a simple bootloader, create a floppy disk image with it, and run it using QEMU. We’ll go deeper into the code, setup tools, and next steps for extending your bootloader skills.
Your bootloader is the first code the BIOS executes after loading it into memory at 0x7c00.
Here’s a simple example that prints a message using BIOS interrupts:
[BITS 16] - tells NASM to assemble for 16-bit mode (real mode)[ORG 0x7c00] - sets code origin, where BIOS loads the bootloadermov si, msg - loads message string pointerprint_string - loop that prints each character using BIOS int 0x10times 510-($-$$) db 0 - pads the bootloader to 510 bytes (total boot sector size is 512 bytes)dw 0xAA55 - mandatory boot signature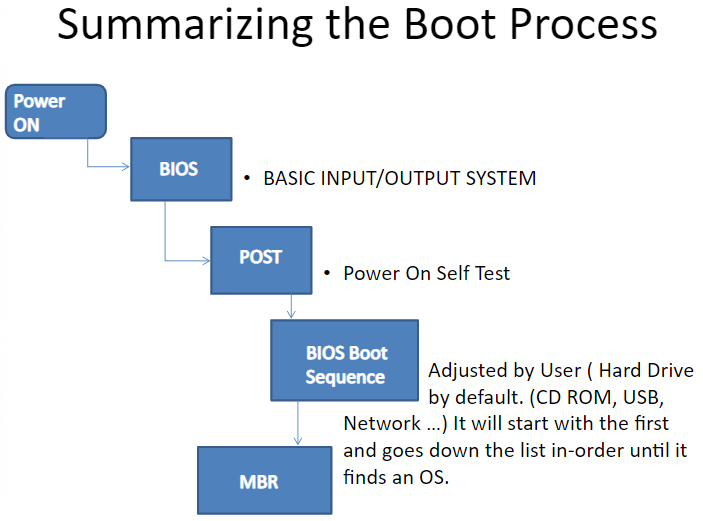
Use NASM to assemble the bootloader into a raw binary:
nasm -f bin boot.asm -o boot.img
This creates a 512-byte file named boot.img, which represents a floppy disk boot sector.
A floppy disk image is a raw file that represents a floppy disk’s data. You can create a blank 1.44MB floppy image and copy your bootloader onto it:
dd if=/dev/zero of=floppy.img bs=512 count=2880
dd if=boot.img of=floppy.img conv=notrunc
floppy.img is now a full floppy disk image with your bootloader in the first sector.
Use QEMU to boot your floppy disk image in a virtual machine:
qemu-system-x86_64 -fda floppy.img
Your bootloader is limited to 512 bytes — that’s why you might want to load more sectors from disk to expand functionality.
You can use BIOS interrupt int 0x13 to read sectors from the floppy, and chain-load other code.
This unlocks possibilities for simple OS loaders, or even tiny games.
// Example BIOS disk read (in NASM)
mov ah, 0x02        ; read sectors function
mov al, 1           ; number of sectors to read
mov ch, 0           ; track 0
mov cl, 2           ; sector 2 (first after boot sector)
mov dh, 0           ; head 0
mov dl, 0           ; drive 0 (floppy)
mov bx, buffer      ; segment:offset where data will be loaded
int 0x13            ; BIOS disk service
[BITS 16]
[ORG 0x7c00]

start:
    cli
    xor ax, ax
    mov ds, ax
    mov es, ax
    sti

    call print_dashboard

main_loop:
    mov ah, 0x00
    int 0x16
    cmp al, 'W'
    je write_app
    cmp al, 'w'
    je write_app
    cmp al, 'P'
    je paint_app
    cmp al, 'p'
    je paint_app
    cmp al, 'S'
    je shutdown
    cmp al, 's'
    je shutdown
    jmp main_loop

print_dashboard:
    mov si, dash_msg
    call print_string
    ret

write_app:
    call clear_screen
    mov si, write_header
    call print_string
    mov cx, 0
    mov dx, 5

write_loop:
    call set_cursor_pos
    mov ah, 0x00
    int 0x16
    cmp al, 0x1B
    je return_dashboard
    cmp al, 0x08
    je write_backspace
    cmp al, 0x20
    jb write_loop
    cmp al, 0x7E
    ja write_loop
    push ax
    mov ah, 0x0E
    int 0x10
    pop ax
    inc cx
    cmp cx, 80
    jne write_loop
    mov cx, 0
    inc dx
    cmp dx, 24
    jne write_loop
    jmp write_loop

write_backspace:
    cmp cx, 0
    je write_loop
    dec cx
    call set_cursor_pos
    mov ah, 0x0E
    mov al, ' '
    int 0x10
    call set_cursor_pos
    jmp write_loop

paint_app:
    call clear_screen
    mov si, paint_header
    call print_string
    mov cx, 40
    mov dx, 12

paint_loop:
    call set_cursor_pos
    mov ah, 0x00
    int 0x16
    cmp al, 0x1B
    je return_dashboard
    cmp al, 0x20
    jne paint_check_arrows

    mov ah, 0x08
    mov bh, 0
    mov dh, dl
    mov dl, cl
    int 0x10
    mov bl, al

    cmp bl, 0xDB
    je paint_erase_block

    mov ah, 0x0E
    mov al, 0xDB
    int 0x10
    jmp paint_loop

paint_erase_block:
    mov ah, 0x0E
    mov al, ' '
    int 0x10
    jmp paint_loop

paint_check_arrows:
    cmp al, 0
    jne paint_loop
    mov ah, 0
    int 0x16
    mov ah, 0x00
    int 0x16
    mov ah, 0x00

    cmp ah, 0x48
    jne paint_right_check
    cmp dx, 5
    jle paint_loop
    dec dx
    jmp paint_loop

paint_right_check:
    cmp ah, 0x4B
    jne paint_down_check
    cmp cx, 0
    jle paint_loop
    dec cx
    jmp paint_loop

paint_down_check:
    cmp ah, 0x50
    jne paint_left_check
    cmp dx, 23
    jge paint_loop
    inc dx
    jmp paint_loop

paint_left_check:
    cmp ah, 0x4D
    jne paint_loop
    cmp cx, 79
    jge paint_loop
    inc cx
    jmp paint_loop

set_cursor_pos:
    mov ah, 0x02
    mov bh, 0
    mov dh, dl
    mov dl, cl
    int 0x10
    ret

print_string:
    lodsb
    cmp al, 0
    je print_done
    mov ah, 0x0E
    int 0x10
    jmp print_string
print_done:
    ret

clear_screen:
    mov ax, 0x0600
    mov bh, 0x07
    mov cx, 0
    mov dx, 0x184F
    int 0x10
    ret

return_dashboard:
    jmp start

shutdown:
    mov si, shutdown_msg
    call print_string
    cli
    hlt
    jmp shutdown

dash_msg db 0x0D,0x0A, "=== TinyASM OS Dashboard ===", 0x0D,0x0A
         db "W: Write App", 0x0D,0x0A
         db "P: Paint App", 0x0D,0x0A
         db "S: Shut Down", 0x0D,0x0A, 0

write_header db 0x0D,0x0A, "Write App (type your text, ESC to return):", 0x0D,0x0A, 0
paint_header db 0x0D,0x0A, "Paint App (use arrows, SPACE to toggle block, ESC to return):", 0x0D,0x0A, 0
shutdown_msg db 0x0D,0x0A, "Shutting down... Goodbye!", 0x0D,0x0A, 0

times 510-($-$$) db 0
dw 0xAA55